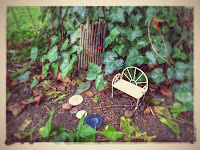
It's no secret that we LOVE making fairy/gnome things at Our Beautifully Messy House...fairy houses, fairy furniture, fairy doors, gnome doors, flower fairies, fairy folk...need I go on? We just can't help it! What I love the most about making fairy doors and gnome doors is surprising people with them! L and I made an abundance of CRAFT STICK FAIRY DOORS this week as we prepare to spread them around the neighborhood. Of course we enjoy surprising our friends and close neighbors, but what I really love is putting them on strangers' front porches and sneaking them into their gardens! We rarely get to see people discover the fairy and gnome doors, but the surprise, the magic in it all makes L and I giggle for days! We've had a great time making these craft stick fairy doors...aren't they the cutest!?!

Materials needed:
-crafts sticks (big, small, colored, any or all)
-wood glue
-Q-tips
-buttons

Optional materials:
-acrylic paint
-sealant spray
-wire & nails

First, lay out your craft sticks in a door shape. If you have colored sticks, your kids will enjoy playing with patterns!


Using a Q-tip, put wood glue onto a small craft stick and carefully lay it across your door. If you don't have small craft sticks, you can always cut a normal-sized one in half! It's best to put at least 2 sticks across, but you can play with the angles and directions that you put them. Remember, fairy doors don't have to be perfect!


If you don't plan to paint your door, you can glue a button-handle on now too!

After the glue has dried a good bit, flip your doors over and smear wood glue all across the back for extra support. Let them dry for a few hours or overnight.


Next, if your craft sticks are plain and you want to, paint the doors. We especially like to add glitter paint to ours...helps the fairies and gnomes find the doors of course.


After the paint has dried, glue on button-handles if you have not done so yet. We like to spray our doors with some acrylic sealant as well...makes the wood a little more durable outdoors and gives them a more finished look.

Now for the fun part, hide them around town...or give them to friends! These would make an adorable party favor for both kids and adults! Enjoy!!!


Other posts you may like:


Thanks for posting such an amazing DIY collection. The collections are so elegant and have an amazing natural tone with it. You can also check out Children's Educational Games. Children can enjoy these games while traveling or sitting in their room. They also provide a great level of educational value.
ReplyDelete